
HP ProLiant SL210t Gen8 Plus Server Maintenance and Service Guide


Removal and replacement procedures 34
4.
In a 1U node configuration:
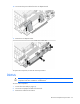
a. Remove the 1U cable guard. ("Remove the 1U cable guard" on page 27)
b. Remove the 1U air baffle (on page 28).
c. Disconnect and remove the Mini-SAS cable ("Remove the Mini-SAS cable" on page 26).
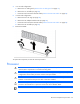
5. In a 2U node configuration:
a. Remove the PCI riser cage (on page 24).
b. Remove the 2U adapter board bracket (on page 26).
c. Disconnect and remove the Mini-SAS cable ("Remove the Mini-SAS cable" on page 26).
d. Remove the 2U air baffle (on page 29).
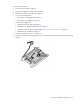
6. Remove the DIMM.
To replace the component, reverse the removal procedure.
Processor
WARNING: To reduce the risk of personal injury from hot surfaces, allow the drives and the
internal system components to cool before touching them.
CAUTION: To prevent possible node malfunction and damage to the equipment, multiprocessor
configurations must contain processors with the same part number.
CAUTION: The heatsink thermal interface media is not reusable and must be replaced if the
heatsink is removed from the processor after it has been installed.
CAUTION: To prevent possible node overheating, always populate processor socket 2 with a
processor and a heatsink or a processor socket cover and a heatsink blank.
IMPORTANT: Processor socket 1 must be populated at all times or the node does not function.