
HP Universal Switch Rail Kit Installation Instructions
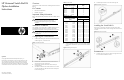
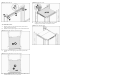

Figure 5 Installing the rail
To install the Switch
1. Slide the switch on the rails until the left ear (comes with the
switch) is flush with the column.
2. Rotate the switch to get the right front corner behind the column.
Figure 6 Installing the right front corner of the switch
3. Shift the switch to the right to get the left ear to pass the left
column
Figure 7 Installing the left front corner of the switch
4. Slide switch back until left front ear mates with the left rail. Use
included 10-32 screws to secure the switch.
Figure 8 Fastening the screws
5. Install the velcro strap towards the middle of the switch if
shipping in a rack without a unit above the switch.
Figure 9 Velcro Shipping Strap