HP ProLiant SL170z G6 Server Installation Sheet Part Number 539705-005
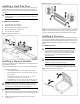
Item Description 10 Video port Rear Panel Components Figure 2 Rear panel components of the z6000 chassis with two SL170z servers Item Description 1 RJ45 port 2 Power supply 2 3 Power supply 1 4 UID LED Server Configuration Resources In addition to this Installation Sheet, other resources are available for more information regarding the configuration and maintenance of your server: Identifying Chassis Components Front Panel Components Figure 1 Front panel components of the z6000 chassis with
6. If you do not have the latest BIOS, update the BIOS now. Refer to the ProLiant SL170z G6 Server Maintenance and Service Guide available on the HP website: http://www.hp.com. 7. Install a supported operating system of your choice. For detailed procedures, refer to the documentation provided by the operating system vendor. For a list of operating systems supported by your ProLiant server, go to http://www.hp.com/go/supportos.
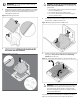
Installing a Hard Disk Drive Figure 6 Installing a memory module Each chassis can accommodate two server trays. Each server tray can accommodate six LFF hard disk drives for a maximum of 12 LFF hard disk drives per chassis. The server supports both SAS and SATA hard disk drives. CAUTION: Drives can be damaged by static electricity. Before handling drives, touch an unpainted metal surface to discharge static electricity. To install a hard disk drive: 1. Unlock the HDD carrier latches. 2.
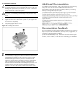
IMPORTANT: Be sure the processor remains inside the processor installation tool. 2. CAUTION: THE PINS ON THE SYSTEM BOARD ARE VERY FRAGILE AND EASILY DAMAGED. To avoid damage to the system board: • If the processor has separated from the installation tool, carefully re-insert the processor in the tool. Handle the processor by the edges only, and do not touch the bottom of the processor, especially the contact area. • • Figure 8 Reinserting a processor 4.
To install the heatsink: CAUTION: Heatsink screws should be tightened and loosened in opposite sequence. Do not overtighten the screws as this can damage the system board, connectors, or screws. A maximum torque of 6-8 in-lb is set for the system. Additional Documentation For additional documentation, refer to HP ProLiant SL170z G6 Easy Set-up CD. You can also access additional information and documentation from the HP external website, either by connecting directly or through the Easy Set-up CD.
Legal notices © Copyright 2009, 2013 Hewlett-Packard Development Company, L.P. The information contained herein is subject to change without notice. The only warranties for HP products and services are set forth in the express warranty statements accompanying such products and services. Nothing herein should be construed as constituting an additional warranty. HP shall not be liable for technical or editorial errors or omissions contained herein.