
HP ProLiant SL160z G6 Server Installation Sheet


5. Verify the server BIOS version against the latest BIOS version
listed for this server on the HP website: http://www.hp.com.
6. If you do not have the latest BIOS, update the BIOS now. Refer
to the ProLiant SL160z G6 Server Maintenance and Service
Guide available on the HP website: http://www.hp.com.
7. Install a supported operating system of your choice. For
detailed procedures, refer to the documentation provided by
the operating system vendor. For a list of operating systems
supported by your ProLiant server, go to
http://www.hp.com/go/supportos
.
Pre- and Post-installation
Procedures
When installing additional options in your HP ProLiant SL160z G6
Server, observe the following procedures:
Pre-installation Procedures
1. Turn off the server and all the peripherals connected to it.
2. Remove the server from the chassis by following the procedure
described later in the “Removing the server” section.
Post-installation Procedures
1. Be sure all components are installed according to the described
step-by-step instructions.
2. Check to make sure you have not left loose tools or parts inside
the server.
3. Reinstall the PCI riser, peripherals, and system cables that you
have removed.
4. Reinstall the server into the chassis.
5. Connect all external cables to the system.
6. Press the power button on the front panel to turn on the server.
Removing the Server
You need to remove the server from the chassis before you can
remove or replace a server component.
CAUTION:
When the servers are operational, tray blank
577723-001 (HP option kit P/N 579069-B21) must be
installed in the server slot after removal of the server.
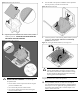
To remove the server:
1. Press the tray latch to release the tray handle.
2. Rotate the tray handle to disengage the power connector.
3. Pull the server tray assembly out of the chassis.
4. Install the tray blank in the server slot.
Figure 3 Removing the server
Figure 4 Installing the tray blank
Installing the Hard Disk Drive
One server tray can accommodate up to 2 LFF hard disk drives, and
the chassis can accommodate 2 server trays for up to 4 LFF hard disk
drives. The server supports both SAS and SATA hard disk drives.
CAUTION: Drives can be damaged by static electricity. Before
handling drives, touch an unpainted metal surface to
discharge static electricity.
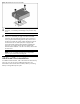
To install the hard disk drive in the server tray:
1. Unlock the HDD carrier latches.
2. Rotate the HDD carrier handle up.
3. Insert the HDD carrier and align the four pins.
4. Rotate the HDD carrier handle down.
5. Lock the HDD carrier latches.