HP ProLiant SL160z G6 Server Installation Instructions Part Number 571291-004
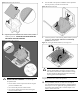
Item Description 7 UID LED/SW 8 PCI Slot 9 Health LED 10 Power Button Rear Panel Components Figure 2 Rear panel components of the z6000 chassis with 2 SL160z servers Item Description 1 RJ 45 Port 2 Power Supply 2 3 Power Supply 1 4 UID LED Server Configuration Resources Identifying Server Components In addition to this Installation Sheet, other resources are available for more information regarding the configuration and maintenance of your server: 1.
5. Verify the server BIOS version against the latest BIOS version listed for this server on the HP website: http://www.hp.com. 6. If you do not have the latest BIOS, update the BIOS now. Refer to the ProLiant SL160z G6 Server Maintenance and Service Guide available on the HP website: http://www.hp.com. 7. Install a supported operating system of your choice. For detailed procedures, refer to the documentation provided by the operating system vendor.
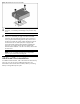
Figure 5 Installing the hard disk drive Installing the Processor The HP ProLiant SL160z G6 server supports Intel®Nehalem® 5500 Series Processors High Wattage 80W and Intel®Xeon® 5600 Series Processors High Wattage 95W, and Intel®Nehalem® 5500 Series Processors Low Wattage 60W and Intel®Xeon® 5600 Series Processors Low Wattage 40W. To install the processor: CAUTION: Use the process install tool to insert the processor into the socket.
Figure 8 Reinserting the processor 4. Press the tabs on the processor installation tool to separate it from the processor, and then remove the tool. Figure 10 Removing the tool 3. Align the processor installation tool with the socket, and then install the processor. THE PINS ON THE SYSTEM BOARD ARE VERY FRAGILE AND EASILY DAMAGED. Figure 9 Installing the processor 5. Close the processor socket retaining bracket and the processor locking lever. The processor socket cover is automatically ejected.
Figure 12 Installing the heat sink assembly CAUTION: Be sure that the heat sink sits squarely on the processor, or overheating and damage to the processor may occur. IMPORTANT: If the heat sink has been removed for any reason, it is critical that you apply more thermal interface material to the integrated heat spreader on the processor to ensure proper thermal bonding between the processor and the heat sink.
Legal notices © Copyright 2011 Hewlett-Packard Development Company, L.P. The information contained herein is subject to change without notice. The only warranties for HP products and services are set forth in the express warranty statements accompanying such products and services. Nothing herein should be construed as constituting an additional warranty. HP shall not be liable for technical or editorial errors or omissions contained herein.