
HP ProLiant ML570 Generation 2 Server Memory Installation Guide


Memory
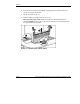
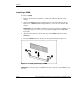
3. Engage the locking switch (3).
Hot-replacement procedure: All LEDs now turn off except the memory status
LED, which flashes green while data are copied from one memory board to the
other. This process may take up to a minute to complete. When the copying
process is complete, the other LEDs re-illuminate as described in Table 1-10.
CAUTION: Do not remove the memory board while the memory status LED is
flashing. When the memory status LED is flashing, the memory board is
transferring data. Removing the memory board during data transfer may cause
system failure.
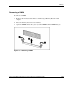
Figure 1-7: Installing the memory board
4. If the server is not currently configured for hot-plug mirrored memory, power up
the server. Refer to the setup and installation guide on the Documentation CD.
Hot-plug procedure: If the server is configured for hot-plug mirrored memory,
skip to step 7.
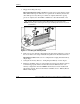
5. Configure the memory. Refer to “Configuring the Memory” in this chapter.
6. Reference the LEDs on the top of the memory board to be sure that the memory
is functioning properly. Table 1-10 describes what the LED states for each
memory configuration when the DIMMs and memory board are installed and
functioning properly. For more information on LEDs, refer to “Memory Board
LEDs” in this chapter.
1-30 HP ProLiant ML570 Generation 2 Server Memory Installation Guide
HP CONFIDENTIAL
Writer: Jennifer Hayward File Name: b-ch1 Memory.doc
Codename: Seabiscuit Part Number: 279987-003 Last Saved On: 5/8/03 8:58 AM