
HP ProLiant ML500 Series Generation 2 Server Memory Installation Guide


Memory
HP ProLiant ML500 Series Generation 2 Server Memory Installation Guide 1-25
HP CONFIDENTIAL
Writer: Jim Yurick File Name: b-ch1 Memory.doc
Codename: Time Bandit Part Number: 279987-002 Last Saved On: 8/23/02 1:07 PM
2. Open the hot-plug door. Refer to “Opening the Hot-Plug Door” in Chapter 3,
“Installing Hardware Options,” in the setup and installation guide on the
Documentation CD.
Hot-replacement procedure: Determine which memory board you want to
remove by locating the memory board with an amber memory status LED and
one or more amber DIMM status LEDs. The “Ready to Hot Plug” LED must be
green, indicating that you can perform a hot-plug procedure.
NOTE: If the “Ready to Hot Plug” LED is off on both boards, then you must power down
the server before replacing DIMMs.
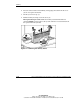
3. Disengage the locking switch (1).
Hot-replacement procedure: After turning the locking switch, the LEDs turn
off, except the amber LEDs. Wait until all green LEDs are off before proceeding.
Make note of which DIMM status LED remains illuminated amber. This is the
DIMM you need to remove and replace.
CAUTION: Do not attempt to unlock the memory board in an operational server
when the “Ready to Hot Plug” LED is not green. This generates an audible alarm
and causes the memory board LEDs to flash amber. Proceeding to remove the
memory board after the audible and visible alarms causes system failure.
CAUTION: To prevent system failure, do not remove the memory board from
the server until the memory status LED stops flashing.