
Compaq ProLiant ML530 Setup and Installation Guide

3-20 Compaq ProLiant ML530 Setup and Installation Guide
Compaq Confidential – Need to Know Required
Writer: Tricia Acevedo Project: Compaq ProLiant ML530 Setup and Installation Guide Comments:
Part Number: 139006-002 File Name: d-ch3 Installation.doc Last Saved On: 6/15/00 9:02 AM
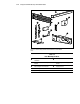
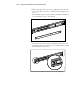
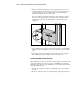
2. When you mark the positioning of the mounting bracket screws, also
mark the positioning in the front of the rack for the cage nuts. These are
two slots marked “C” on the template. The cage nuts will hold the
thumbscrews through the server's faceplate.
Be sure to follow the alignment instructions on the template, and keep
the sides of the template squared up with the sides of the rack. Tick
marks on the rack’s vertical rails will help you maintain the proper
alignment.
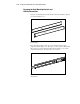
Figure 3-12. Measuring with the ProLiant ML530 template
3. After marking the front of the rack, turn the template over and mark the
back rails of the rack. Open the rear door of the rack to access the back
rails.
4. On the back of the rack, mark the rail to show the top of the template.
This will help you align a template for the next component.
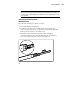
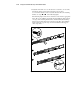
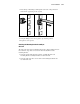
Inserting Cage Nuts in the Rack Frame
After marking the positions for the fasteners in both the front and back of the
rack, use the fitting tool to insert cage nuts on the inside of the rails at the
marked locations. The cage nuts and fitting tool are included in the hardware
kit supplied with the rack.
1. Position the cage nut as shown in the following figure, on the inside of
the rail.
2. Hook one of the lips of the cage nut through the square rail perforation.