
ProLiant ML530 Generation 2 Server Setup and Installation Guide


Installing Hardware Options
3-46 HP ProLiant ML530 Generation 2 Server Setup and Installation Guide
HP CONFIDENTIAL
Writer: Richard O. Heath File Name: d-ch3 Installing Hardware Options.doc
Codename: Seattle Slew Part Number: 225579-002 Last Saved On: 1/8/03 3:00 PM
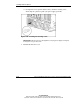
IMPORTANT: Once the Remote Insight board is installed in your server, be sure that you
connect your video cable into the video connector on the rear of the Remote Insight
board. The standard video connector on the server rear panel is not used when the
Remote Insight board is installed. For more information, refer to the documentation that
ships with the Remote Insight board option kit.
9. Power up the server. See “Powering Up the Server” in Chapter 5, “Installing the
Rack Server” or Chapter 6, “Installing the Tower Server.”
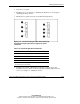
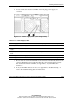
10. Be sure that the internal health LED on the front panel LED assembly is
illuminated green, indicating that the system is functioning properly. For detailed
information on LEDs, see Appendix C, “System LEDs and Switches.”
11. If the LED indicates an error, see Appendix D, “Troubleshooting,” or refer to the
troubleshooting guide for instructions.
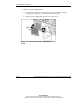
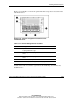
Hot-Plug Power Supplies
CAUTION: Hot-plug power supplies for the ProLiant ML530 Generation 2 server are
keyed to ensure that only 600-W hot-plug power supplies can be installed in the
server. The handles on 600-W power supplies are carbon (black) to distinguish them
from 450-W power supplies, which are opal (white).
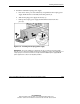
CAUTION: Always populate power supply bays with either a power supply or blank.
Proper airflow can only be maintained when the bays are populated. Unpopulated
power supply bays can lead to improper cooling and thermal damage.
IMPORTANT: For rack-model servers, do not install the power supplies until after the server
is installed in the rack. Leaving the power supplies out reduces the weight of the server for
purposes of rack installation.