
ProLiant ML310 Generation 2 Server Maintenance and Service Guide
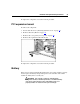
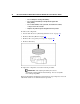

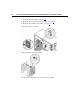

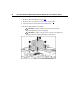

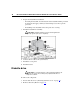
Table Of Contents
- HP ProLiant ML310 Generation 2 Server Maintenance and Service Guide
- Notice
- Contents
- Illustrated parts catalog
- Removal and replacement procedures
- Required tools
- Safety considerations
- Preparation procedures
- Bezel
- Hot-plug SCSI hard drive
- Hot-plug SATA/SAS hard drive
- Access panel
- PCI expansion board
- Battery
- DIMM
- Air baffle
- Fan
- Power supply
- Processor assembly
- Diskette drive
- CD-ROM/DVD-ROM drive
- Installing a full-height tape drive option
- Full-height tape drive
- Power button/LED board
- Hard drive (non-hot-plug)
- Hot-plug SCSI backplane
- Hot-plug SATA or SAS backplane
- System board
- Server cabling
- Diagnostic tools
- Server component identification
- Front panel components
- Front panel LEDs and buttons
- Rear panel components
- Rear panel LEDs and buttons
- System board components
- System board LEDs
- System LEDs and internal health LED combinations
- SCSI IDs
- Hot-plug SCSI hard drive LEDs
- Hot-plug SCSI hard drive LED combinations
- Hot-plug SATA or SAS IDs
- SATA or SAS hard drive LEDs
- Fan locations
- Specifications
- Acronyms and abbreviations
- Index

Removal and replacement procedures 23
DIMM
You can expand server memory by installing PC-3200 DDR SDRAM DIMMs
with Advanced ECC. The system supports up to four DIMMs for a maximum of
4 GB.
Refer to "System Board Components (on page 57
)" for DIMM slot locations and
bank assignments.
To remove the component:
1. Power down the server ("Powering down the server" on page 15
).
2. Remove the bezel ("Bezel" on page 17
).
3. Remove the access panel ("Access panel" on page 20
).
4. Remove the DIMM.
IMPORTANT: DIMMs do not seat fully if turned the wrong way.
To replace the component, reverse the removal procedure.
For DIMM configuration information, refer to DIMM installation guidelines (on
page 24
).