
HP ProLiant ML150 Generation 5 Server Redundant Power Supply Installation Instructions
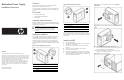
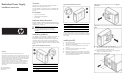


11. Slightly lift up the power supply and then push toward the front
of the chassis until it clears the support ledge.
12. Tilt the power supply toward the bottom of the chassis and
carefully remove it from the chassis.
Figure 6 Removing the existing power supply unit (cables not shown)
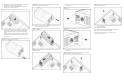
13. a. Before installing the RPS into the chassis with right side
access panel, dismount the left-side bracket (the one aligned
with the edge of RPS unit) by removing the three mounting
screws.
b. Before installing the RPS into the chassis with left side access
panel, dismount the right-side bracket by removing the three
mounting screws.
Figure 7 Removing the left-side bracket on the RPS unit for installing
into the chassis with right side access panel.
Figure 8 Removing the right-side bracket on the RPS unit for installing
into the chass with left side access panel.
14. Carefully position the RPS into the chassis and slide to the rear
until flush with the rear chassis panel.
Figure 9 Installing the RPS on the chassis with right side access panel
(cables not shown).
Figure 10 Installing the RPS on the chassis with left side access panel
(cables not shown).
15. Reinstall the mounting screws to secure the RPS to the rear of
the chassis.
Figure 11 Install the mounting screws on the chassis with right side
access panel
Figure 12 Install the mounting screws on the chassis with left side
access panel
16. Install the two additional screws to secure the RPS to the side of
the chassis.
Figure 13 Installing the additional mounting screws on the chassis
with right side access panel (cables not shown)
Figure 14 Installing the additional mounting screws on the chassis
with left side access panel
17. Reconnect all power supply cables to the mass storage devices
and the system board.
18. Reinstall the air baffle.
19. Reinstall the access panel and tighten the thumbscrews.
20. Return the server to the upright position.
21. Connect the power cables to the power supplies.
Installation is now complete.