
ProLiant ML150 Generation 2 Server Maintenance and Service Guide


Removal and Replacement Procedures
2-34 HP ProLiant ML150 Generation 2 Server Maintenance and Service Guide
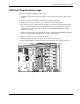
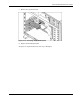
9. Remove the screw on the side (1) and 10 screws on the front (2) securing the hard drive
cage to the chassis with a T-15 Torx screwdriver.
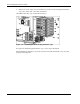
10. Pull the hard drive cage out from the chassis (3).
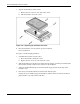
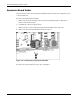
Figure 2-34: Removing the SATA hot-plug hard drive cage
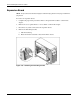
To replace the SATA hot-plug hard drive cage, reverse steps 2 through 10.
When installing the hard drive cage in the chassis, be sure that the hard drive cage is seated
properly on the supporter.