
Supporting HP TeachNow, v 1.1 update

Wizard example
Based on feedback from TeachNow 1.0, the process for importing pre-built images, and for creating images from a
reference device, was not easily understood.
Importing from the Supplementary Disk DVD
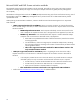
The import process for pre-built images is simplified. The images on the DVD are named using the
following template: base-client-type_OStype_HP-version-number.exe, so XP Pro for an st5742 would
be 5740_XP_Pro_VL_1-1-0.exe. You can drag and drop the file onto the shortcut, or double-click the
.exe right on the DVD. Accept the default locations (it will extract to the same location that the
shortcut describes, by default) then click Extract.
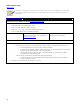
The installer places an Application Suite Import shortcut on the desktop. It is a shortcut to the file
system location for imported Application Suites (the import location: C:\Program Files (x86)\Hewlett-
Packard\TeachNow\IM\files.
Import
shortcut
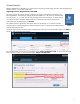
Launch the Administrative Console and click the Application Suites tab to see the available images. Click Add to
launch the Add Application Suite Wizard.
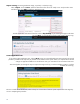
The wizard launches and you have two selectable options: Create application suite, to capture the OS image
from a reference system, or for the pre-built images, Import existing suite.
11