
Intel Matrix Storage Manager User's Manual


“RAID Ready”
R
Caution: This operation will delete all existing data from the additional hard drive or drives and the data
cannot be recovered. It is critical to backup all important data on the additional drives before
proceeding. The data on the source hard drive, however, will be preserved.
To turn a RAID Ready system into a RAID 0 or RAID 1 system using two hard drives, complete
the following steps:
1. Physically add an additional Serial ATA hard drive to the system
2. Boot to Windows* and install the Intel® Matrix Storage Manager (if needed)
3. Open the Intel® Matrix Storage Console (Start/All Programs/Intel® Matrix Storage
Manager/Intel® Matrix Storage Console)
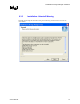
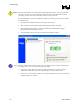
4. The Intel® Matrix Storage Console user interface should look as follows:
Note: If the user interface does not look similar to the view displayed above, switch to the Basic mode
by clicking on the ‘View’ menu, then selecting ‘Basic mode’.
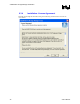
5. Click on the ‘Protect data from a hard drive failure with RAID 1’ or ‘Improve storage
performance with RAID 0’ icon in the right-hand pane to create a RAID volume.
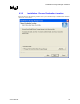
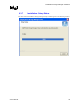
6. Click on the ‘Create a RAID x volume’ icon to begin the migration process. In the following
example, RAID 1 was selected.
40 User's Manual