
ProLiant ML110 Generation 2 Server Maintenance and Service Guide


Removal and Replacement Procedures
To remove a memory module:
1. Perform steps 1 through 3 of the pre-installation instructions.
2. Remove the access panel.
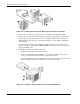
3. Lay the server on its side (components showing).
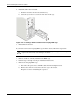
4. Remove the air baffle for better access to the DIMM slots (DIMM1 to DIMM4).
5. If necessary, remove any accessory boards or cables that prevent access to the DIMM
slots.
6. Locate the memory module you want to remove.
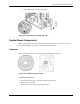
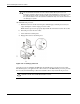
7. Remove the selected memory module:
a. Completely open the holding clips securing the module.
This forces the module up in the slot and makes it easier to remove.
b. Gently pull the memory module upward to remove it from its slot.
Figure 2-35: Removing a memory module
8. Place the memory module on a static-dissipating work surface or inside an anti-static bag.
To install a memory module:
1. Locate an empty DIMM slot on the system board.
2. Remove the memory module from its protective packaging, handling it by the edges.
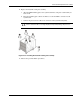
3. Install the memory module:
a. Orient the module so that the notch on its bottom edge aligns with the keyed surface
of the DIMM slot, and then press it fully into the slot.
The DIMM slots are structured to ensure proper installation. If you insert a memory
module but it does not fit easily into the slot, you may have inserted it incorrectly.
Reverse the orientation of the module and insert it again.
HP ProLiant ML110 Generation 2 Server Maintenance and Service Guide 2-31