
ProLiant ML110 Generation 2 Server Maintenance and Service Guide


Removal and Replacement Procedures
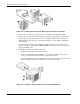
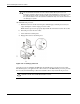
4. Install the SATA new hard disk:
a. Slide the new drive into the selected drive bay.
b. Close the ejector lever to secure the new drive in the cage.
Figure 2-27: Installing a SATA hard disk in the hot-plug HDD cage
5. Reinstall the front bezel.
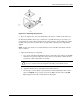
If you need to remove the hot-plug HDD cage from the chassis, follow the steps below:
CAUTION: Failure to remove hard drives from the hot-plug HDD cage prior to removing the
cage from the chassis may cause damage to the drives.
1. Remove all drives currently installed in the HDD cage.
2. Perform steps 1 through 4 of the pre-installation instructions.
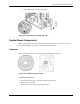
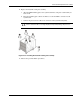
3. Remove the hot-plug HDD cage:
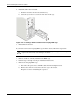
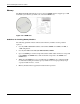
a. Disconnect the power, data, and LED cables from the backplane board.
b. Remove the six Torx screws that secure the cage to the chassis.
Keep the screws for reinstalling the cage later.
2-24 HP ProLiant ML110 Generation 2 Server Maintenance and Service Guide