
HP ProLiant ML110 Generation 2 Lights-Out 100 Remote Management Card Installation Instructions

Installing the HP ProLiant ML110
Generation 2 Lights-Out 100 Remote
Management Card
1. Lay the server on its side (components showing).
2. Locate the 30-pin remote management card connector on the
system board.
3. Remove the remote management card from its protective
packaging.
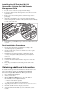
4. Align the card (with the spacer support attached) with the
remote management card slot on the system board, then firmly
seat the card on the slot
5. Perform the post-installation procedures described in the next
section.
Post-installation Procedures
1. Be sure all components are installed according to the
described step-by-step instructions.
2. Check to make sure you have not left loose tools or parts
inside the server.
3. Reinstall any expansion board(s), peripheral(s), board
cover(s), and system cable(s) that have previously been
removed.
4. Reinstall the system covers.
5. Connect all external cables and the AC power cord to the
system.
6. Press the power button on the front panel to turn on the
server.
Obtaining additional information
To obtain the latest product documentation, and the most recent
driver and software updates for the HP ProLiant ML110
Generation 2 Lights-Out 100 Remote Management Card:
1. Go to
http://www.hp.com/support.
2. Select your location.
3. On the Support & Drivers page, select the kind of
information you need. Options include:
⎯ Drivers and software updates
⎯ Support and troubleshooting information
4. Type the product name
ProLiant ML110 Generation 2.
5. Click the double-arrows to begin your search.
6. Select the kind of information you need from the search
results.