
ProLiant DL760 Generation 2 Server Maintenance and Service Guide

I/O Module Removal and Replacement Procedures
7. Properly connect the expansion board I/O cable.
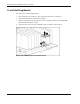
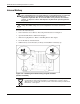
8. Activate power to the slot through the PCI Hot Plug software application or by pressing
the PCI Hot Plug Button above the corresponding I/O expansion slot.
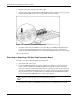
Figure 6-15: Activating the PCI Hot Plug Button
9. Check the amber and green LEDs for slot status. The green LED will flash during the
power-up transition and will remain lit when the power-up process is complete. For
details about PCI Hot Plug LEDs, refer to “PCI Hot Plug LED Indicators” in this chapter.
10. Close the I/O lid.
Removing or Replacing a PCI Hot Plug Expansion Board
To remove or replace a PCI Hot Plug expansion board:
1. Open the I/O lid of the server.
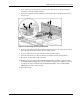
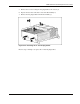
2. Use the PCI Hot Plug Button or software application to notify the system to turn off
power to the slot. Pushing the PCI Hot Plug button notifies the system to shut down
operation of this expansion board; lifting the lever actually powers down the expansion
slot. The green LED will flash during the power down transition and will turn off when
the power down process is complete. For more information about PCI Hot Plug LEDs,
refer to “PCI Hot Plug LED Indicators” earlier in this chapter.
CAUTION: To avoid system power-down and subsequent data loss, do not open the slot
release lever unless the green PCI Hot Plug LED of the slot is off.
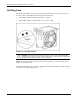
3. Disconnect the cables to the PCI/PCI-X board when the green LED of the slot is off.
6-16 HP ProLiant DL760 Generation 2 Server Maintenance and Service Guide