
ProLiant DL740 Server Maintenance and Service Guide

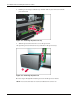
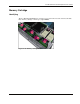


Table Of Contents
- HP ProLiant DL740 Server Maintenance and Service Guide
- Notice
- Contents
- About This Guide
- Chapter 1: Illustrated Parts Catalog
- Chapter 2: Service Preparation
- Chapter 3: Chassis Components Removal and Replacement Procedures
- Chapter 4: Host Module Removal and Replacement Procedures
- Chapter 5: Power and Media Module Removal and Replacement Procedures
- Chapter 6: Diagnostic Tools
- Chapter 7: Connectors, Switches, and LED Indicators
- Connectors
- System Board
- Switches
- LED Indicators
- System Power LED Switch
- Unit Identification LED Switches (Front and Rear)
- System Interconnect LED Indicators
- System Attention LED Indicators
- System Activity LED Indicators
- Hot-Plug SCSI Hard Drive LED Indicators
- Power Supply LED Indicators
- Hot-Plug Fan LED Indicators
- PCI Hot Plug LED Indicators
- Memory Cartridge LED Indicators
- DIMM Status LED Indicators
- Chapter 8: Physical, Operating, and Performance Specifications
- Index

Host Module Removal and Replacement Procedures
HP ProLiant DL740 Server Maintenance and Service Guide 4-13
HP CONFIDENTIAL Codename: Jethro Part Number: 270853-004 Last Saved On: 2/13/04 10:40 AM
Installing DIMMs in the Cartridge
CAUTION: When handling a DIMM, be careful not to touch any of the contacts. Doing so might
damage the DIMM.
IMPORTANT: Be sure that DIMMs are installed in the proper orientation. The DIMMs are keyed to
ensure that they are installed correctly in the memory socket. Refer to the system documentation for
details.
IMPORTANT: Be sure that the DIMMs are installed in bank pairs and in proper bank pair order
(1+2, then 3+4, then 5+6, then 7+8).
To install DIMMs in the memory cartridge:
1. Slide each DIMM into the appropriate socket on the memory board (1).
2. Secure the DIMM by lifting the locking levers into place (2).
Figure 4-14: Installing DIMMs in the memory cartridge
3. Be sure that all of the DIMM socket levers are rotated inward.
4. Insert the memory cartridge into the server and secure it in place by rotating the cartridge
lever down.
5. Lock the memory cartridge in place by sliding the cartridge lock to the locked position.
6. Be sure that the cartridge is online.