
Compaq Parallel Database Cluster Model PDC/O2000 for Oracle8i and Windows 2000 Administrator Guide


6-16 Compaq Parallel Database Cluster Model PDC/O2000 for Oracle8i and Windows 2000 Administrator Guide
Compaq Confidential – Need to Know Required
Writer: John Blackburn Project: Compaq Parallel Database Cluster Model PDC/O2000 for Oracle8i and Windows 2000 Administrator Guide Comments:
Part Number: 225082-002 File Name: g-ch6 Cluster Management.doc Last Saved On: 6/13/01 10:29 AM
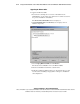
5. Insert drives into the added RA4000/RA4100 Array.
6. Using the Fibre Channel cables, physically connect the RA4000 Array
Controllers in the added RA4000/RA4100 Array to the Fibre Channel
SAN Switches, FC-AL Switches, or Storage Hubs.
7. Connect all of the RA4000/RA4100 Arrays to a power source and
restart them.
8. Restart the primary cluster node.
9. On the primary node, run the Array Configuration Utility to create drive
arrays, configured with RAID, and then create logical drives.
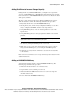
10. Using Disk Management, create an extended partition on each of the
logical drives.
11. Using Disk Management, create logical partitions within each extended
partition.
IMPORTANT: Do not format the drives. Oracle8i Parallel Server uses raw partitions,
which requires that the drive not be formatted with any file system.
12. Power on the other cluster nodes.
13. Verify that the same shared disk resources are seen from every node in
the cluster by running Disk Management on each node.
14. Make sure you can see the same shared disk resources from each node
using Secure Path Manager as you can using the Disk Management.
15. Define the active array controller in the newly-added RA4000/RA4100
Array.
16. Perform the necessary Oracle commands to associate the new data files
to the database.
Refer to the Oracle8i Parallel Server Setup and Configuration Guide for more
detailed instructions.
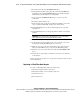
Replacing a Failed Fibre Host Adapter
To replace a failed Fibre Host Adapter in a cluster node:
1. Shut down the Oracle instance on the node.
2. Shut down the Oracle services running on the node.
3. Shut down the server.
4. Power off the node.