
HP ProLiant DL385p Gen8 Server MSG


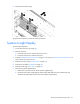

Removal and replacement procedures 49
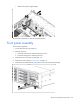
6.
Remove the air baffle ("Air baffle" on page 33).
7. Remove all drives ("Hot-plug drive" on page 38).
8. If installed, remove the optical drive ("Optical drive" on page 40).
9. Remove the fan cage ("Fan cage" on page 44).
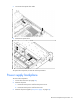
10. Disconnect all cables from the front panel assembly.
IMPORTANT: If any cables in the front panel assembly need replacing, the entire front panel
assembly must be replaced.
11. Remove the four T-10 Torx screws from each side, and then remove the front panel assembly.
To replace the component, reverse the removal procedure.
Flash-backed write cache procedures
Two types of procedures are provided for the FBWC option:
• Removal and replacement of failed components:
o Removing the cache module ("Flash-backed write cache module" on page 49)
o Removing the capacitor pack ("Flash-backed write cache capacitor pack" on page 51)
• Recovery of cached data from a failed server ("Recovering data from the flash-backed write cache" on
page 53)
CAUTION: Do not detach the cable that connects the battery pack or capacitor pack to the cache
module. Detaching the cable causes any unsaved data in the cache module to be lost.
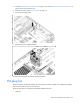
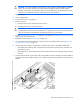
Flash-backed write cache module
To remove the component: