
HP ProLiant DL380 G6 Server User Guide
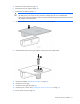

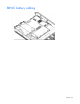
Table Of Contents
- HP ProLiant DL380 G6 Server User Guide
- Abstract
- Notice
- Contents
- Component identification
- Front panel components
- Front panel LEDs and buttons
- Systems Insight Display LEDs
- Systems Insight Display LED combinations
- Rear panel components
- Rear panel LEDs and buttons
- Non-hot-plug PCI riser board slot definitions
- System board components
- SAS and SATA device numbers
- SAS and SATA hard drive LEDs
- SAS and SATA hard drive LED combinations
- PCI riser cage LEDs
- Battery pack LEDs
- Hot-plug fans
- Operations
- Setup
- Hardware options installation
- Introduction
- Processor option
- Memory options
- Hot-plug SAS hard drive options
- Optical drive option
- Redundant hot-plug power supply option
- Expansion board options
- PCI riser board option
- Hard drive cage option
- HP Trusted Platform Module option
- Cabling
- Configuration and utilities
- Troubleshooting
- Battery replacement
- Regulatory compliance notices
- Regulatory compliance identification numbers
- Federal Communications Commission notice
- Declaration of conformity for products marked with the FCC logo, United States only
- Modifications
- Cables
- Canadian notice (Avis Canadien)
- European Union regulatory notice
- Disposal of waste equipment by users in private households in the European Union
- Japanese notice
- BSMI notice
- Korean notice
- Chinese notice
- Laser compliance
- Battery replacement notice
- Taiwan battery recycling notice
- Power cord statement for Japan
- Electrostatic discharge
- Specifications
- Technical support
- Acronyms and abbreviations
- Index
Configuration and utilities 69
The utility also provides support for the following functions:
• Reconfiguring one or more logical drives
• Viewing the current logical drive configuration
• Deleting a logical drive configuration
• Setting the controller to be the boot controller
If you do not use the utility, ORCA will default to the standard configuration.
For more information regarding array controller configuration, refer to the controller user guide.
For more information regarding the default configurations that ORCA uses, refer to the HP ROM-Based Setup
Utility User Guide on the Documentation CD.
Re-entering the server serial number and product ID
After you replace the system board, you must re-enter the server serial number and the product ID.
1. During the server startup sequence, press the F9 key to access RBSU.
2. Select the Advanced Options menu.
3. Select Service Options.
4. Select Serial Number. The following warnings appear:
WARNING! WARNING! WARNING! The serial number is loaded into the system during
the manufacturing process and should NOT be modified. This option should only
be used by qualified service personnel. This value should always match the
serial number sticker located on the chassis.
Warning: The serial number should ONLY be modified by qualified personnel.
This value should always match the serial number located on the chassis.
5. Press the Enter key to clear the warning.
6. Enter the serial number and press the Enter key.
7. Select Product ID. The following warning appears:
Warning: The Product ID should ONLY be modified by qualified personnel. This
value should always match the Product ID on the chassis.
8. Enter the product ID and press the Enter key.
9. Press the Esc key to close the menu.
10. Press the Esc key to exit RBSU.
11. Press the F10 key to confirm exiting RBSU. The server automatically reboots.
Management tools
Automatic Server Recovery
ASR is a feature that causes the system to restart when a catastrophic operating system error occurs, such as
a blue screen, ABEND, or panic. A system fail-safe timer, the ASR timer, starts when the System Management
driver, also known as the Health Driver, is loaded. When the operating system is functioning properly, the
system periodically resets the timer. However, when the operating system fails, the timer expires and restarts
the server.