
Compaq ProLiant DL380 Generation 2 Setup and Installation Guide


3-22 Compaq ProLiant DL380 Generation 2 Server Setup and Installation Guide
Compaq Confidential – Need to Know Required
Writer: Rob Weaver Project: Compaq ProLiant DL380 Generation 2 Server Setup and Installation Guide Comments:
Part Number: 203844-001 File Name: d-ch3 Installing Hardware Options.doc Last Saved On: 4/5/01 1:55 PM
■
DIMMs installed in bank C must be of equal or greater capacity than the
largest pair of DIMMs installed in banks A or B.
■ RBSU must be used to configure online spare memory.
Table 3-3 lists the DIMM option kit part numbers for supported DIMMs.
Table 3-3
DIMM Option Kit Part Numbers
Part Numbers Description
201692-B21 256-MB (2×128 MB) option kit
201693-B21 512-MB (2×256 MB) option kit
201694-B21 1-GB (2×512 MB) option kit
201695-B21 2-GB (2×1 GB) option kit
Installing DIMMs
Before installing DIMMs, review the “DIMM Installation Guidelines” section
in this chapter.
CAUTION: Electrostatic discharge can damage electronic components. Properly
ground yourself before beginning any installation procedure. See Appendix B,
“Electrostatic Discharge,” for more information.
To install a DIMM:
1. Power down the server. See the “Powering Down the Server” section in
this chapter.
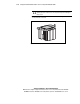
2. Remove the access panel. See the “Removing the Access Panel” section
in this chapter.
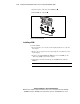
3. Identify the correct DIMM slot. See the “DIMM Slot Identification”
section in this chapter.
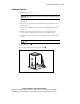
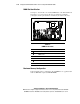
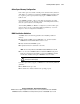
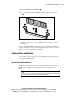
4. Open the DIMM slot latches.
5. Align the key slot in the bottom edge of the DIMM with the tab in the
DIMM slot.
IMPORTANT: DIMMs do not seat if turned the wrong way.