
Compaq ProLiant DL380 Generation 2 Setup and Installation Guide


Remote Insight Lights-Out Edition (Optional) 5-9
Compaq Confidential – Need to Know Required
Writer: Rob Weaver Project: Compaq ProLiant DL380 Generation 2 Server Setup and Installation Guide Comments:
Part Number: 203844-001 File Name: f-ch5 Remote Insight Lights-Out Edition.doc Last Saved On: 4/30/01 1:58 PM
■
ROM-Based Configuration Utility (F8)
This software is a versatile, system-independent ROM-based
configuration utility that enables fast and easy setup of the Remote
Insight board.
■ Single mouse cursor mode
The Remote Insight board can be set to use single cursor mode in
remote console (requires Java 1.3.0_01 VM).
■ Enabled Pocket PC access
Firmware version 2.31 and newer provides a preview of Remote Insight
board support for wireless and dial-up access from the Compaq iPAQ
TM
H3600 Series Pocket PC handheld devices. The Remote Insight board
provides a special user-interface when connecting from the Compaq
iPAQ Pocket PC.
NOTE: The Pocket PC access is a technology preview enhancement only and is not
currently supported beyond verification by the Compaq Technical Phone Support Center
that it is configured correctly.
■ Group administration
Compaq Remote Insight Configuration Language can be used for
writing group administration procedural scripts for the Compaq Remote
Insight Lights-Out Edition board. Remote Insight Configuration
Language uses Extensible Markup Language (XML). Detailed
instructions and a sample file on how to write a user configuration script
are available in the Compaq Remote Insight Lights-Out Edition User
Guide. Group administration for the Remote Insight board can be done
independently of Compaq Insight Manager XE by using batch
processing.
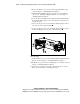
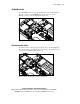
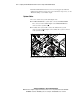
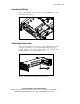
Installation
To install the Remote Insight Lights-Out Edition expansion board in the
ProLiant DL380 Generation 2 server:
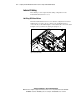
1. Power down the server. See the “Powering Down the Server” section in
Chapter 3, “Installing Hardware Options.”
2. Remove the access panel. See the “Removing the Access Panel” section
in Chapter 3, “Installing Hardware Options.”
3. Remove the PCI shipping bracket. See the “Removing the PCI Shipping
Bracket” section in Chapter 3, “Installing Hardware Options.”