
ProLiant DL360 Generation 4p Server (SAS Model) Maintenance and Service Guide


Removal and replacement procedures 14
4.
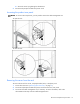
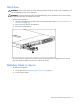
Loosen the thumbscrews that secure the server faceplate to the front of the rack.
5. Extend the server from the rack ("Extending the server from the rack" on page 12).
6. Disengage the server from the rack. For more information, refer to the documentation that ships with
the rack mounting option.
7. Place the server on a sturdy, level surface.
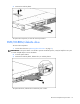
Access panel
WARNING: To reduce the risk of personal injury from hot surfaces, allow the drives and
the internal system components to cool before touching them.
CAUTION: Do not operate the server for long periods with the access panel open or removed. Operating
the server in this manner results in improper airflow and improper cooling that can lead to thermal damage.
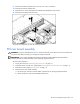
1. To remove the component:
2. Power down the server if the standard cable management solution is installed ("Powering down the
server" on page 11).
NOTE: If the optional cable management arm is installed, you can extend the server and perform hot-plug
installation or maintenance procedures without powering down the server.
3. Extend the server from the rack, if applicable ("Extending the server from the rack" on page 12).
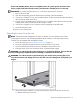
4. Lift up on the hood latch handle and remove the access panel.
To replace the component, reverse the removal procedure.
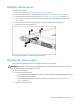
Hard drive blank
CAUTION: To prevent improper cooling and thermal damage, do not operate the server unless all bays
are populated with either a component or a blank.
To remove the component:
To replace the blank, slide the blank into the bay until it locks into place.