
ProLiant DL320 Setup and Installation Guide


3-24 Compaq ProLiant DL320 Setup and Installation Guide
Compaq Confidential – Need to Know Required
Writer: Gilbert Saldivar Project: Compaq ProLiant DL320 Setup and Installation Guide Comments:
Part Number: 203836-001 File Name: d-ch3 Installing Hardware Options.doc Last Saved On: 8/23/00 4:00 PM
3. Remove the access panel. See “Removing the Access Panel” earlier in
this chapter.
4. Remove the PCI riser board assembly. See “Removing the PCI Riser
Board Assembly” earlier in this chapter.
5. Remove the PCI expansion slot cover. See “Removing the Expansion
Slot Cover” earlier in this chapter.
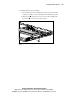
6. Insert the Compaq Remote Insight Lights-Out Edition into the
expansion slot, and secure the PCI riser board assembly in the chassis.
For detailed information, see Steps 5 and 6 of “Installing the Expansion
Board” earlier in this chapter.
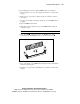
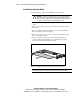
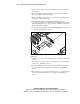
7. Connect the Compaq Remote Insight Lights-Out Edition to its connector
on the ProLiant DL320 system board.
Figure 3-20. Cabling the Compaq Remote Insight Lights-Out Edition to the
system board
8. Install the access panel. See “Installing the Access Panel” earlier in this
chapter.
9. Insert the server into the rack. See “Inserting the Server into the Rack”
in Chapter 4, “Installing the Server.”
10. Fasten the thumbscrew that secures the fixed cable tray to the server.
See “Attaching the Fixed Cable Tray” in Chapter 4, “Installing the
Server.”
11. Reconnect the power cord and peripheral devices. See “Connecting the
Power Cord and Peripheral Devices” in Chapter 4, “Installing the
Server.”