
Compaq ProLiant DL320 Ultra-Dense Server Deployment in Compaq Racks

Compaq ProLiant DL320 Ultra-Dense Server Deployment in Compaq Racks 32
13AS-0900A-WWEN
Routing Power Cords
Use the following guidelines to route server power cords in 22U, 36U and 42U racks.
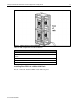
High Voltage Y-Cables
Connect the single-cord section of the Y-cable to the PDU installed on the same side as the cable
management tray. Align the Y-joint with the rear rack support and center it between the rack rails
of the two servers that the Y-cable supports. Use two plastic tie wraps to secure the Y-joint to the
rack support. After installing the servers, connect the cables to the servers and route the slack
through the cable management system with the other server cables.
Low Voltage Power Cords
Route and connect the low-voltage power cord to the PDU after the server is installed. Connect
the power cord to the server first and route it through the cable management system with the other
server cables. Route the power cord inside the rear rack support to the PDU.
IMPORTANT: In 7000-series racks, route the power cables from the servers to the PDUs
through the gap in the rear of the rack rail.
Installing Rack Rail Solutions
Both the standard fixed rails and the sliding rails are designed to snap in place without screws or
nuts.
The rack template included with the server provides an easy and reliable way to properly position
the rack rails in the rack. The template is double-sided and printed with arrows that show where
items are inserted, both for the rack rails and for the thumbscrews that secure the server faceplate
to the front of the rack. Use the template to identify the proper square holes in the rack for
inserting the rack rail tabs. Using a pencil, mark the vertical rack supports along the top and
bottom edges of the template.
Align the two front tabs on the front of the rack rail with the holes identified at the front of the
rack. Insert the front tabs of the rack rail into the rack. Compress the rack rail toward the front of
the rack until the rear tabs align with the inner holes at the back of the rack. Insert the rear tabs
into the rear holes and release the rail. The rail locks securely in place.
Note: Before installing the rack rails for the Sliding Rails and Cable Management Solution,
remove the server rails from the slide rail assembly. See the “Preparing the ProLiant DL320 for
Rack Installation” section earlier in this paper for more information.
Note: Install a ProLiant DL320 server in every U from the bottom to the top for maximum
density.
Repeat the procedure for any subsequent rack rails.