
ProLiant DL320 Generation 3 Server User Guide

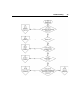
Table Of Contents
- HP ProLiant DL320 Generation 3 Server User Guide
- Notice
- Contents
- Server component identification
- Server operations
- Powering up the server
- Powering down the server
- Preparation procedures
- Extending the server from the rack
- Removing the access panel
- Installing the access panel
- Removing the PCI riser board assembly
- Installing PCI riser board assembly
- Removing the hot-plug SATA backplane
- Removing the fan assembly
- Installing the fan assembly
- Server setup
- Hardware options installation
- Server cabling
- Server software and configuration utilities
- Battery replacement
- Troubleshooting
- Electrostatic discharge
- Regulatory compliance notices
- Regulatory compliance identification numbers
- Federal Communications Commission notice
- Declaration of conformity for products marked with the FCC logo, United States only
- Modifications
- Cables
- Mouse compliance statement
- Canadian notice (Avis Canadien)
- European Union regulatory notice
- Japanese notice
- BSMI notice
- Korean notice A&B
- Laser compliance
- Battery replacement notice
- Taiwan battery recycling notice
- Power cord statement for Japan
- Server specifications
- Technical support
- Acronyms and abbreviations
- Index

Troubleshooting 77
Service notifications
To find out the latest service notifications, refer to the HP website
(http://www.hp.com/products/servers/platforms
). Select the appropriate server
model, and then click the Documentation link on the product page.
Loose connections
Action:
• Be sure all power cords are securely connected.
• Be sure all cables are properly aligned and securely connected for all external
and internal components.
• Remove and check all data and power cables for damage. Be sure no cables
have bent pins or damaged connectors.
• If a fixed cable tray is available for the server, be sure the cords and cables
connected to the server are correctly routed through the tray.
• Be sure each device is properly seated.
• If a device has latches, be sure they are completely closed and locked.
• Check any interlock or interconnect LEDs that may indicate a component is
not connected properly.
• If problems continue to occur, remove and reinstall each device, checking the
connectors and sockets for bent pins or other damage.
Diagnostic steps
To effectively troubleshoot a problem, HP recommends that you start with the
first flowchart in this section, "Start diagnosis flowchart (on page 78
)," and
follow the appropriate diagnostic path. If the other flowcharts do not provide a
troubleshooting solution, follow the diagnostic steps in "General diagnosis
flowchart (on page 80
)." The General diagnosis flowchart is a generic
troubleshooting process to be used when the problem is not server-specific or is
not easily categorized into the other flowcharts.