
ProLiant DL320 Generation 3 Server User Guide

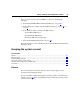

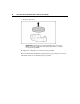
Table Of Contents
- HP ProLiant DL320 Generation 3 Server User Guide
- Notice
- Contents
- Server component identification
- Server operations
- Powering up the server
- Powering down the server
- Preparation procedures
- Extending the server from the rack
- Removing the access panel
- Installing the access panel
- Removing the PCI riser board assembly
- Installing PCI riser board assembly
- Removing the hot-plug SATA backplane
- Removing the fan assembly
- Installing the fan assembly
- Server setup
- Hardware options installation
- Server cabling
- Server software and configuration utilities
- Battery replacement
- Troubleshooting
- Electrostatic discharge
- Regulatory compliance notices
- Regulatory compliance identification numbers
- Federal Communications Commission notice
- Declaration of conformity for products marked with the FCC logo, United States only
- Modifications
- Cables
- Mouse compliance statement
- Canadian notice (Avis Canadien)
- European Union regulatory notice
- Japanese notice
- BSMI notice
- Korean notice A&B
- Laser compliance
- Battery replacement notice
- Taiwan battery recycling notice
- Power cord statement for Japan
- Server specifications
- Technical support
- Acronyms and abbreviations
- Index
69
Battery replacement
If the server no longer automatically displays the correct date and time, you may
need to replace the battery that provides power to the real-time clock. Under
normal use, battery life is 5 to 10 years.
WARNING: The computer contains an internal lithium
manganese dioxide, a vanadium pentoxide, or an alkaline battery
pack. A risk of fire and burns exists if the battery pack is not
properly handled. To reduce the risk of personal injury:
• Do not attempt to recharge the battery.
• Do not expose the battery to temperatures higher than
60°C (140°F).
• Do not disassemble, crush, puncture, short external contacts,
or dispose of in fire or water.
• Replace only with the spare designated for this product.
To remove the component:
1. Power down the server ("Powering down the server" on page 19
).
2. Extend or remove the server from the rack ("Preparation procedures" on page
20
).
3. Remove the access panel ("Removing the access panel" on page 21
).
4. Remove the PCI riser cage ("Removing the PCI riser board assembly" on
page 22
).
CAUTION: To prevent damage to the server or expansion
boards, power down the server and remove all AC power cords before
removing or installing the PCI riser cage.