
HP ProLiant DL185 Generation 5 Server Software Configuration Guide


System BIOS configuration 29
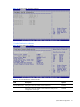
It is recommended that you check this screen during the initial system setup and each time you install,
remove, or upgrade accessories.
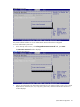
You first need to enable the display of the diagnostic screen during bootup. Follow the steps below.
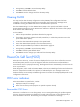
To view the boot-time diagnostic screen:
1. In the Main menu screen, select Boot Options.
2. Select the BIOS Summary Display field.
3. Press the plus (+) or minus (-) key to set the field to Enabled.
4. Press F10 to save the changes you made and close the Setup Utility.
5. Reboot the server.
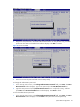
The BIOS Summary Display screen is displayed briefly at the end of POST.
Figure 30 BIOS Summary Display screen
6. Press the Pause/Break key to continue displaying the screen until another key is pressed.
7. Press any key to continue with the system bootup.
Recording custom Setup values
Write down the settings from the Setup Utility and keep them in a safe place. If the custom values ever
need restoring (after clearing CMOS, for example), you must run the Setup Utility and enter these
custom settings again. Having a record of these custom settings makes this much easier.
Loading system defaults
If the system fails after you make changes in the Setup menus, reboot the server, enter Setup, and
load the system default settings to correct the error. These default settings have been selected to
optimize the server’s performance. Setup default settings are quite demanding in terms of resource
consumption. If you are using low-speed memory chips or other types of low-performance components
and you choose to load these settings, the system might not function properly.
To load the system defaults:
1. Reboot the server in a normal manner.