
ProLiant DL145 Generation 3 Server Maintenance and Service Guide

Removal and replacement procedures 45
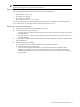
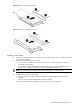
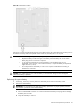
Figure 50 Removing a full-sized riser board
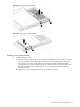
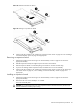
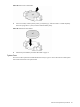
Figure 51 Removing a low-profile riser board
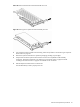
Installing a riser board
1. Perform the procedure described in the “Removing a riser board assembly” section on page 42 to remove
the appropriate assembly.
2. Prepare the assembly for the new riser board:
• If no riser board is installed on the assembly, remove the two screws installed on the inside of the
vertical side of the assembly.
• If a riser board is already installed on the assembly, perform the procedure in the “Removing a riser
board” section on page 44 to remove the riser board and expansion board, if any.
NOTE: Keep the two screws you remove in this step for installing the new riser board later.
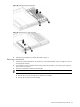
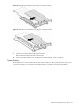
3. Install the new riser board on the assembly:
a. Align the back of the riser board with the mounting posts and screw holes on the inside of the
assembly.
The slot on the riser board should face the inside of the assembly.
b. Secure the riser board to the assembly using the two screws you removed in step 2.