
ProLiant DL145 Generation 3 Server Maintenance and Service Guide


Removal and replacement procedures 37
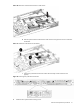
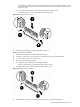
Figure 40 Securing a processor
8. If the heat sink is new, remove the protective cover on the bottom of the heat sink.
9. Install the heat sink:
a. Align the heat sink over the processor, then place the heat sink on top of the processor and the heat
sink guide rails.
CAUTION: Do not overtighten the two spring-loaded screws or they may break off. A maximum
torque of 8-in-lb is set for the system.
b. Tighten the two spring-loaded screws a few threads, alternating between each screw. Then tighten the
screws completely to secure the heat sink to the processor base.
To tighten the screws, HP recommends using the L-shaped wrench that ships with the server.
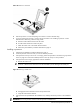
IMPORTANT: If the heat sink is removed for any reason, it is critical that you apply more thermal
interface material to the integrated heat spreader on the processor to ensure proper thermal bonding
between the processor and the heat sink. Clean the contact surface of both the processor and heat
sink with an alcohol pad, then re-apply an HP-approved thermal interface material before re-installing
the processor. Use a pattern of five dots when applying the thermal interface material—one dot in the
center, and one dot at each corner. HP recommends using Shin-Etsu X23-7783D thermal grease
compound for your ProLiant server.