
ProLiant DL145 Generation 3 Server Maintenance and Service Guide


Removal and replacement procedures 22
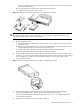
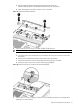
Figure 16 Removing a non-hot-plug SATA hard drive from the chassis
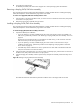
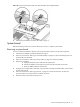
4. Remove the hard drive from the HDD carrier:
a. Remove the four mounting screws that secure the hard drive to the HDD carrier.
b. Remove the hard drive from the HDD carrier.
Figure 17 Removing a non-hot-plug SATA hard drive from the HDD carrier
IMPORTANT: If you remove a hard drive and do not plan to install a new one immediately, you must reinstall
the mounting screws at their pre-installed location for future use, then reinstall the HDD carrier in the chassis to
ensure the proper cooling of the system. Then perform the post-installation procedures described on page 12.
Installing a non-hot-plug SATA hard drive
1. Perform the pre-installation procedures described on page 11.
2. Select a drive bay for the new hard drive.
If the drive bay is occupied, remove the currently installed drive by following the procedures described in
the “Removing a non-hot-plug SATA hard drive” section on page 21.
If the drive bay is empty, perform step 3 in the “Removing a non-hot-plug SATA hard drive” section
described on page 21, then remove four mounting screws from the HDD carrier. You will use these screws
to install the new drive.
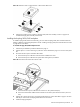
3. Install the new hard drive in the HDD carrier:
a. Align the new hard drive on the HDD carrier.
If you are installing the new drive in a previously occupied drive bay, use the HDD carrier and
mounting screws you removed from the old drive.