
HP ProLiant DL145 Generation 3 Server Software Configuration Guide


Server management 51
b. Tighten the captive screw on the rear panel.
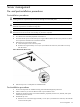
5. Connect all external cables and the AC power cord to the system.
Route the cables properly through the available cable management arrangement.
6. Press the power button on the front panel to turn on the server.
Configuring the BMC
The server includes a BMC for systems management, which you can access through a 10/100 Mbps LAN port
for IPMI management. To access the BMC through this LAN port, you must configure the IP address. You can
configure the settings for the BMC by using either the Setup Utility or another system (such as a laptop) that is
connected to the serial port on the server. The serial port can be controlled by the server or shared between the
server and the BMC (the default setting).
To configure the BMC through the Setup Utility:
1. In the I/O Device Configuration submenu, set the Serial port Mode field to Shared or BMC. See the “I/O
Device Configuration submenu” section on page 15 for more information.
2. In the LAN Settings submenu under the IPMI submenu, set the IP address, default gateway, and IP subnet
mask for the BMC. You can set the addresses manually or use DHCP to set the addresses automatically.
See the “LAN Settings submenu” section on page 18 for more information.
3. Also in the LAN Settings submenu, set the LAN Controller field to select which connection the BMC uses for
the IPMI LAN interface. See the “LAN Settings submenu” section on page 18 for more information.
To configure the BMC through the serial port:
1. Connect another system (such as a laptop) to the serial port on the server.
2. Configure your terminal session with the following settings:
• Bits per second: 9600
• Data bits: 8
• Parity: None
• Stop bits: 1
• Flow control: None
3. Press Esc Shift-9 to toggle the BMC session to remote console redirection; press Esc Shift-Q to toggle back
to the command line protocol (CLP).
4. Start your terminal session.
5. Press Enter to bring up a prompt.
6. If the first prompt is for a password, press Enter again.
7. At the Login prompt, type your user name and press Enter.
The default user name is admin.
8. At the Password prompt, type your password and press Enter.
The default password is admin.
The message CLP Session Initiated displays.
9. At the prompt, type cd map1/nic1 to navigate to the correct directory.
The command line interface is SMASH-compliant.
10. Type show to display the current settings.
11. Modify the settings you want to change.
NOTE: The set variables are case-sensitive.
For example, by default, the BMC is set to use DHCP to get the IP address. To manually set the IP address,
type set oemhp_dhcp_enable=FALSE to disable DHCP, then type set networkaddress=xxx.xxx.xxx.xxx to set
the IP address you want.
To revert to using DHCP to set the IP address, type set oemhp_dhcp_enable=TRUE to enable DHCP. The
system takes a few seconds to set the new IP address.
12. Open a browser and enter the IP address that you set manually or that was set automatically using DHCP.
13. When prompted, enter the same user name and password you used in your terminal session.
14. Browse the server settings using the user interface that displays.