
HP ProLiant DL145 Generation 3 Server Software Configuration Guide


System BIOS configuration 25
Loading system defaults
If the system fails after you make changes in the Setup menus, reboot the server, enter Setup, and load the system
default settings to correct the error. These default settings have been selected to optimize the server’s
performance. Setup default settings are quite demanding in terms of resource consumption. If you are using low-
speed memory chips or other types of low-performance components and you choose to load these settings, the
system might not function properly.
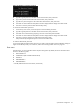
To load the system defaults:
1. Reboot the server in a normal manner.
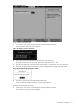
2. During POST, press F10 to access the Setup Utility.
3. Press F9 to load the default values.
4. Press F10 to save the changes and close the Setup Utility.
Clearing CMOS
You may need to clear the Setup configuration values (CMOS) if the configuration has been corrupted, or if
incorrect settings made in the Setup Utility have caused error messages to be unreadable. Clearing the CMOS
data removes the administrator password.
The clear CMOS setting is on jumper block P57 on the system board. Refer to the HP ProLiant DL145 Generation
3 Server Maintenance and Service Guide for the location of this jumper block and the clear CMOS setting.
To clear CMOS:
1. Perform the pre-installation procedures described on page 50.
2. If necessary, remove any expansion boards, assemblies, or cables that prevent access to the clear CMOS
jumper block.
3. Locate the CMOS jumper block (P57) on the system board.
By default, the jumper is installed in the park position, on the left and middle pins (as viewed from the front
of the server).
4. Set the jumper over the middle and right pins to clear the CMOS memory.
5. Perform the post-installation procedures as described on page 50.
6. Reboot the system, the power the system off again.
7. Perform the pre-installation procedures as described on page 50.
8. Reinstall the jumper over the left and middle pins.
9. Perform the post-installation procedures as described on page 50.
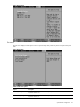
10. During POST, press F10 to access the Setup Utility.
11. Press F9 to load the system default values.
12. Press F10 to save the changes you made and close the Setup Utility.
Power-On Self Test (POST)
When the server boots up, a series of tests are displayed on the screen. This is referred to as Power-On Self-Test
(POST). POST is a series of diagnostic tests that checks firmware and assemblies to ensure that the server is
properly functioning. This diagnostic function automatically runs each time the server is powered on.
These diagnostics, which reside in the BIOS ROM, isolate server-related logic failures and indicate the board or
component that needs to be replaced, as indicated by the error messages. Most server hardware failures are
accurately isolated during POST. The number of tests displayed depends on the configuration of the server.
POST error indicators
When POST detects a system failure, it either:
• Displays a POST error message
• Emits a series of beep codes (requires an optional expansion board)
Recoverable POST Errors
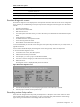
Whenever a non-fatal error occurs during POST, an error message describing the problem appears onscreen.
These text messages are displayed in normal video (white text on black background). It shows the details of the
error. The following is an example of a POST error message: