
HP ProLiant DL145 Generation 3 Server Software Configuration Guide


System BIOS configuration 24
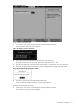
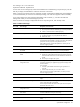
Table 16 Exit menu options
Option Description
Load Setup Defaults Loads the default settings for all BIOS setup fields.
Keyboard shortcut: F9
Discard Changes Discards all changes made in the Setup Utility.
Save Changes Saves changes made in the Setup Utility.
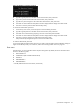
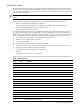
Boot-time diagnostic screen
The boot-time diagnostic screen displays basic and important information about the current server configuration
and is necessary for troubleshooting and may be required when asking for technical support. This information
includes:
• Processor specifications
• BIOS version and release date
• BMC firmware version
• Size of the system and video memory, as well as the memory size allotted for the cache RAM and option
ROM
• Serial port base I/O address
• Available hard drives and expansion boards
• Server asset tag and serial number
• MAC address of each of the three LAN ports
It is recommended that you check this screen during the initial system setup and each time you install, remove, or
upgrade accessories.
You first need to enable the display of the diagnostic screen during bootup. Follow the steps below.
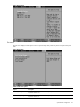
To view the boot-time diagnostic screen:
1. In the Main menu screen, select Boot Options.
2. Select the Boot Summary Screen field.
3. Press the plus (+) or minus (-) key to set the field to Enabled.
4. Press F10 to save the changes you made and close the Setup Utility.
5. Reboot the server.
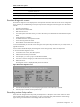
The diagnostic screen is displayed briefly at the end of POST.
Figure 24 Boot-time diagnostic screen
6. Press the Pause/Break key to continue displaying the screen until another key is pressed.
7. Press any key to continue with the system bootup.
Recording custom Setup values
Write down the settings from the Setup Utility and keep them in a safe place. If the custom values ever need
restoring (after clearing CMOS, for example), you must run the Setup Utility and enter these custom settings
again. Having a record of these custom settings makes this much easier.