
SCSI Cable Installation Instructions for HP ProLiant DL100 Series Generation 2 Servers


Pre- and Post-Installation
Procedures
Pre-installation Procedures
1. Turn off the server and all the peripherals connected to it.
2. Unplug all cables from the power outlets to avoid exposure to
high energy levels that may cause burns when parts are
short-circuited by metal objects such as tools or jewelry.
If necessary, label each one to expedite reassembly.
3. Disconnect telecommunication cables to avoid exposure to
shock hazard from ringing voltages.
4. Remove the top cover.
Post-installation Procedures
1. Be sure all components are installed according to the described
step-by-step instructions.
Installing a SCSI Controller Board
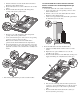
1. Remove the PCI riser board assembly:
2. Check to make sure you have not left loose tools or parts inside
the server.
a. Loosen the two captive thumbscrews that secure the
assembly to the chassis.
3. Reinstall any expansion board(s), peripheral(s), board cover(s),
and system cable(s) that have previously been removed.
b. Lift the assembly away from the chassis.
4. Reinstall the top cover.
5. Connect all external cables and the AC power cord to the
system.
6. Press the power button
on the front panel to turn on the
server.
Installing a SCSI Hard Drive
1. Perform the pre-installation procedures described earlier.
2. Select which drive bay you will use to install the new SCSI
hard drive.
If the desired drive bay is occupied, remove the currently
installed drive following the procedures in the “Removing a
Hard Drive” section on the Installation Sheet that came with
your ProLiant server.
2. Identify the slot that is compatible with the expansion board
you intend to install.
If the desired drive bay is empty, perform steps 1 through 4 of
the “Removing a Hard Drive” section on the Installation Sheet
that came with your ProLiant server, then remove four spare
HDD mounting screws from the HDD carrier. You will use
these spare screws to install the new drive.
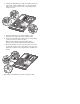
3. Pull out the slot cover from the selected slot.
Store it for reassembly later.
CAUTION: Do not discard the slot cover. If the expansion board is
removed in the future, the slot cover must be reinstalled to
maintain proper cooling.
3. Install the new SCSI hard drive in its carrier:
If you are installing the new drive in a previously occupied
drive bay, use the carrier and HDD mounting screws you
removed from the old drive.
If you are installing the new drive in an empty drive bay, use
the carrier and HDD mounting screws you removed from that
drive bay.
a. Align the new hard drive on the carrier.
b. Secure the hard drive assembly with the four mounting
screws.
c. Slide the hard drive assembly into the chassis.
Removing the cover of the low–profile expansion slot