
HP ProLiant DL140 Server Maintenance and Service Guide

HP ProLiant DL140 Server Maintenance and Service Guide 34
System Board
To remove the system board:
1. Power down the server. See “Powering Down the Server” in this chapter.
2. Remove the top cover. See “Top Cover” in this chapter.
3. Remove the PCI riser board assembly. See “PCI Riser Board Assembly” in this chapter.
4. Disconnect the fan cables 1 through 5. See “Fans” in this chapter.
5. Remove any DIMMs. See “Memory Modules” in this chapter.
6. Remove the fan bracket. See “Fan Bracket” in this chapter.
7. Disconnect the power supply from the system board. See “Power Supply” in this chapter.
8. Disconnect the optical CD-ROM drive assembly cable from the system board. See “Optical
CD-ROM Drive Assembly Cable” in this chapter.
9. Disconnect the ATA drive cables from the hard drives. See “Hard Drives” in this chapter.
10. Remove the processor(s). See “Processor” in this chapter.
CAUTION: Always use a new heatsink when replacing processors on the system. Failure to
use new components may result in damage to the processor. See “Processor” in this chapter.
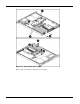
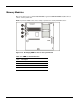
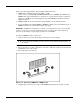
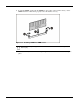
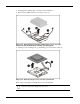
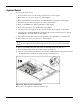
11. Remove 8 heatsink retention module screws and heatsink retention module 4 (1).
12. Remove all screws that secure the system board to the chassis (2).
13. Slide the system board toward the front of the chassis, ensuring that the board unseats from all
the alignment keys, and lift the board up and away from the keys (3).
Figure 2-25: Removing the system board
Reverse steps 1 through 13 to replace the system board.