
HP ProLiant DL140 Generation 3 Server Maintenance and Service Guide


Contents 62
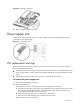
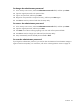
Figure 55 Removing the power supply unit
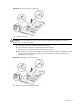
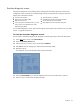
3. Install the new PSU.
CAUTION: Do not over tighten the PSU’s screws to prevent them from breaking off. A maximum
torque of 7 ± 1 is set for the system.
a. Position the new PSU in the PSU section of the chassis.
b. Insert the PSU mounting screw located between the PSU fans.
c. Insert the two PSU mounting screws located in the rear panel.
d. Reconnect the processor power cable, the system board power cable, and the PSU I
2
C cable
to their respective system board connectors, and then reconnect the power cables of all
installed drives to the PSU.
Figure 56 Installing the power supply unit
4. Perform the post-installation procedure.