
HP ProLiant DL140 Generation 3 Server Maintenance and Service Guide


Contents 39
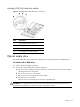
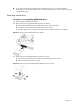
3. Install the new non-hot-plug SATA hard drive in its carrier.
If you are installing the new drive in a previously occupied drive bay, use the HDD carrier and
mounting screws you removed from the old drive.
If you are installing the new drive in an empty drive bay, use the HDD carrier and mounting
screws you removed from that drive bay.
a. Align the new hard drive on the carrier.
b. Secure the hard drive assembly with the four mounting screws.
c. Slide the hard drive assembly into the chassis.
Figure 16 Installing a non-hot-plug SATA hard drive
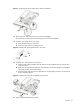
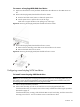
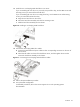
4. Connect the non-hot-plug SATA drive cables.
a. Connect the SATA data and power cables to their corresponding connectors on the rear of
the new drive.
b. Check that all cables are clear of the hard drive carrier, and then tighten the screw that
secures the hard drive assembly to the chassis.
Figure 17 Connecting the non-hot-plug SATA hard drive cables
5. Perform the post-installation procedure.
6. Set up the SATA configuration.
For detailed procedures, refer to the Server Support CD or to the operating system
documentation.