
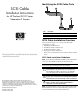
SCSI Cable Installation Instructions for HP ProLiant DL100 Series Generation 2 Servers


Routing the SCSI Drive Cables
Cable routing for SCSI hard drive varies depending on which
expansion slot you installed the SCSI controller board—in the
low–profile slot or in the standard height/full-length slot, and to a
certain extent, to the location of the cable connectors on the SCSI
controller board you installed.
CAUTION: Route the SCSI drive cables neatly. If necessary, secure
them using the pre-installed cable clips located on the chassis
base. The cables should be routed in a position where they will not
be pinched or crimped by the top cover, nor should they hamper
proper airflow inside the chassis.
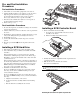
Removing the cover of the standard height/full-length expansion
slot
To route the SCSI drive cables when the controller
board is installed in the low-profile expansion slot:
4. Remove the SCSI controller board from its protective
packaging, handling it by the edges.
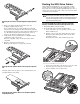
1. Reinstall the PCI riser board assembly.
Some controller boards can only be installed in one slot but
other boards can be configured to fit in either slot by replacing
the default bracket (attached to the board) with a different sized
one. The different sized bracket and instructions on how to
attach it to the board is included in the option kit.
2. Route the SCSI cable towards the SCSI hard drive:
a. Connect the cable to the corresponding connector on the
SCSI controller board.
b. Fold the connector end of the SCSI cable in the manner
illustrated in the following figure, then route the cable
towards the air duct.
5. Verify that the board’s default bracket is compatible with the
configuration of the selected slot.
The marked side of the cable should be facing down.
If it is not compatible, replace the bracket with one that is
compatible.
6. Slide the expansion board into the slot.
Firmly press the board to seat it properly on the slot.
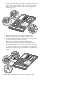
c. Use the two retainer tabs on the air duct to secure the cable.
Installing the SCSI controller board in the low–profile expansion
slot
d. Detach the protective mylar sheet on the air duct.
e. Lay the cable flat on the air duct surface.
The figure below shows the plane section of the PCI riser board
assembly dimmed out for clarity.
Installing the SCSI controller board in the standard height/full-
length expansion slot