
ProLiant DL140 Generation 2 Server Maintenance and Service Guide

Removal and replacement procedures 34
PCI riser board assembly
To remove the PCI riser board assembly:
1. Perform the pre-installation procedure.
2. Disconnect all cables connecting an existing expansion board to the system board.
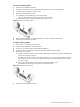
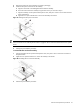
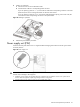
3. Remove the PCI riser board assembly.
a. Loosen the two captive thumbscrews that secure the assembly to the chassis.
b. Lift the assembly away from the chassis.
Figure 45 Removing the PCI riser board assembly
To install the PCI Express riser board:
Installing the PCI Express riser board option allows the use of high bandwidth-intensive peripherals in your
ProLiant server.
NOTE: For ease of reading, the PCI riser board assembly will simply be referred to as “assembly” in the
succeeding sections. Furthermore, in some figures, the plane section of the PCI riser board assembly is dimmed
out for clarity.
1. Remove the PCI riser board assembly following the procedures described in the previous section.
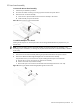
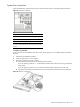
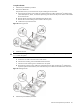
2. Remove the default standard height/full-length PCI-X riser board from the assembly.
Keep the three screws you removed in this step for installing the PCI Express riser board later.
a. Remove the two screws securing the riser board to the assembly.
b. Pull the riser board away from the assembly.
c. Remove the spare screw located on the third tab of the assembly (from the slot cover side).
Figure 46 Removing the default standard height/full-length PCI-X riser board