
ProLiant DL140 Generation 2 Server Maintenance and Service Guide

Removal and replacement procedures 19
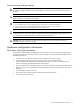
Guidelines for installing hard drives
• Install only hard drive models specified for your ProLiant server. Installing unsupported hard drives may
damage the system by consuming power and generating heat in excess of the server’s operating tolerance.
This condition may result in a loss of system and/or data integrity.
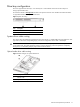
• Install hard disks in the drive carriers included with the server chassis using four of the six HDD mounting
screws pre-installed in each of the two HDD carriers.
Figure 13 HDD mounting screws
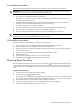
Removing a hard drive
To remove a hard drive:
1. Perform the pre-installation procedure.
2. Disconnect the data and power cables from the rear of the hard drive.
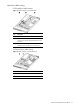
3. Remove the hard drive from the chassis.
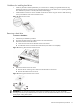
a. Loosen the screw that secures the HDD carrier to the chassis.
b. Push the HDD carrier towards the front of the chassis, then slide it out completely.
Figure 14 Removing the hard drive from the chassis
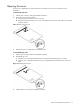
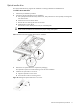
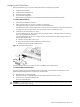
4. Remove the hard drive from its carrier.
a. Remove the four mounting screws that secure the hard drive to the carrier.
b. Remove the hard drive from its carrier.
Figure 15 Removing the hard drive from its carrier
IMPORTANT: If you removed a hard drive without plans of installing a new one, you must reinstall the
mounting screws at their pre-installed location for future use, then reinstall the blank HDD carrier in the chassis
for the proper cooling of the system.