
ProLiant DL140 Generation 2 Server Maintenance and Service Guide

Removal and replacement procedures 18
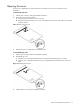
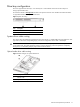
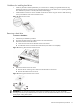
5. Install the new optical drive into the chassis.
a. Slide the optical drive assembly into the chassis until the media device bay release lever snaps into
place.
b. Route the optical drive’s power cables through the cable management opening of the chassis’ partition
wall.
c. Connect the IDE data and power cables to their corresponding connectors on the rear of the drive.
Figure 11 Installing the optical drive assembly in the chassis
6. Perform the post-installation procedure.
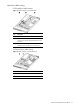
Hard drives
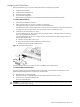
The server’s two 1-inch hard disk drive bays support both non-hot-plug SCSI and SATA drives. Hard drives
installed in the server are labeled as Device 0 and Device 1, from left to right when viewed from the front of the
server.
Figure 12 Hard drive device numbers
Hard drive support
The default system comes with a single hard drive, the type and capacity of which varies based on the server
model. Your ProLiant server currently supports the following drive capacities:
• SCSI hard drives – 36- and 72-GB
• SATA hard drives – 80-, 160-, and 250-GB
The SCSI drive and the 80 GB SATA drive options include only the hard disk. Use the HDD carriers and
mounting screws included with your server to install these drives.
The 160- and 250-GB SATA drive options come with a hot-plug HDD carrier. You need to remove the drives from
their default carriers before installing them in the server. Use the HDD carriers and mounting screws included with
your server to install these drives.