
HP ProLiant DL120 G6 Server Installation Sheet

Item Code Component
28 JP4 BMC password reset jumper
29 PCIE1 Expansion slot 1 (for riser board)
30 PCIE2 Expansion slot 2 (for riser board)
31 CN5 TPM (Trusted Platform Module) connector
32 BAT1 System battery
33 PWRCN2 4-pin ATX processor power connector
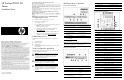
Opening the server
Installing a hard drive
The server has four HDD bays that support 3.5-inch-hot-plug or
non-hot-plug SATA and SAS drives. The type and capacity of drives
vary based on the server model.
IMPORTANT: If you are going to switch from a SATA to
a SAS HDD configuration, install the SAS controller
board first. It is recommended that this controller board
be installed in the full-height/full-length PCI-E Gen2 x16
riser board. After installing the controller board, remove
the HDD SATA cables and install the SAS HDD and
LED cables.
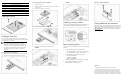
Hot-plug hard drive installation
1. Slide the hard drive assembly into the drive bay until it stops.
2. Press the hard drive carrier latch inward until it clicks.
Non-hot-plug hard drive installation
1. Remove the top cover.
2. Remove the HDD carrier from the bay you want to install the
new drive into.
3. Install the new hard drive in its carrier.
4. Install the new hard drive into the drive bay.
5. Connect the signal and power cables to the drive.
SATA HDD
SAS HDD
Installing a memory module
The system has six DIMM slots that support both unbuffered and
registered DIMM (UDIMM and RDIMM) with ECC support.
Memory installation guidelines
Observe the following important guidelines when installing memory
modules:
• Use only the following HP approved DIMM types:
o PC3-10600 UDIMM in 1-GB, 2-GB, or 4-GB capacities
o PC3-10600 RDIMM in 2-GB or 4-GB capacities
• Populate the DIMM slots in the following sequence:
o DIMM3A and DIMM6B
o DIMM2C and DIMM5D
o DIMM1E and DIMM4F
• Installation of DIMMs with varying speed is not supported.
• Mixing UDIMM and RDIMM is not supported.
• Non-ECC DIMMs are not supported.
Memory module installation
Getting additional documentation
Refer to your server’s Easy Set-up CD for additional information and
updates not provided in this installation sheet. You can also access
additional information and documentation from the HP website at
http://www.hp.com/, either by connecting directly or through the
Easy Set-up CD.
Legal notices
© Copyright 2010 Hewlett-Packard Development Company, L.P.
The information contained herein is subject to change without notice. The
only warranties for HP products and services are set forth in the express
warranty statements accompanying such products and services. Nothing
herein should be construed as constituting an additional warranty. HP shall
not be liable for technical or editorial errors or omissions contained herein.