
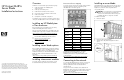
HP ProLiant BL685c Server Blade Installation Instructions


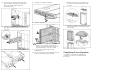

4.
Push the device bay shelf back until it stops, lift the
right side slightly to disengage the two tabs from the
divider wall, and then rotate the right edge
downward (clockwise).
5.
Lift the left side of the device bay shelf to disengage the
three tabs from the divider wall, and then remove it from
the enclosure.
6.
Remove the connector covers.
7.
Prepare the server blade for installation.
8.
Install the server blade.
CAUTION:
To prevent improper cooling and thermal
damage, do not operate the server blade or the
enclosure unless all hard drive and device bays are
populated with either a component or a blank.
9.
Locate the coupler plate that ships with each
full-height device.
10.
Use the coupler plate to join two half-height device bay
blanks to form a full-he
ight device bay blank:
a.
Install the coupler plate on top of the blank, and
then slide the coupler plate forward until it locks
into place.
b.
Install the second blank onto the tabs on the coupler
plate, and then slide the second blank back until it
locks into place.
11.
Install the full-height blank into the device bay.
Completing the configuration
To complete the server blade and HP BladeSystem
configuration, see the overview card that ships with
the enclosure.