
HP ProLiant BL460c G6 Server Blade User Guide
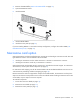
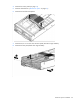

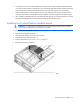
Table Of Contents
- HP ProLiant BL460c G6 Server Blade User Guide
- Abstract
- Notice
- Contents
- Component identification
- Operations
- Setup
- Hardware options installation
- Introduction
- Hard drive option
- Processor option
- Memory options
- Mezzanine card option
- Cache module and battery pack option
- HP Trusted Platform Module option
- Cabling
- Software and configuration utilities
- Troubleshooting
- Battery replacement
- Regulatory compliance notices
- Regulatory compliance identification numbers
- Federal Communications Commission notice
- Declaration of conformity for products marked with the FCC logo, United States only
- Modifications
- Cables
- Canadian notice (Avis Canadien)
- European Union regulatory notice
- Disposal of waste equipment by users in private households in the European Union
- Japanese notice
- BSMI notice
- Korean notice
- Chinese notice
- Laser compliance
- Battery replacement notice
- Taiwan battery recycling notice
- Acoustics statement for Germany (Geräuschemission)
- Electrostatic discharge
- Specifications
- Technical support
- Acronyms and abbreviations
- Index

Hardware options installation 40
• Any attempt to remove an installed TPM from the system board breaks or disfigures the TPM security
rivet. Upon locating a broken or disfigured rivet on an installed TPM, administrators should consider the
system compromised and take appropriate measures to ensure the integrity of the system data.
• When using BitLocker™, always retain the recovery key/password. The recovery key/password is
required to enter Recovery Mode after BitLocker™ detects a possible compromise of system integrity.
• HP is not liable for blocked data access caused by improper TPM use. For operating instructions, see the
encryption technology feature documentation provided by the operating system.
Installing the Trusted Platform Module board
WARNING: To reduce the risk of personal injury from hot surfaces, allow the drives and the
internal system components to cool before touching them.
1. Power down the server blade (on page 12).
2. Remove the server blade (on page 13).
3. Place the server blade on a flat, level work surface.
4. Remove the access panel (on page 14).
5. Remove all hard drives ("Hard drive option" on page 21).
6. Remove the hard drive backplane.
7. Remove the two T-15 screws from the front panel/hard drive cage assembly.