
HP ProLiant BL45p Generation 2 Server Blade Maintenance and Service Guide


Removal and replacement procedures 29
CAUTION: To prevent damage to electrical components, properly ground the server blade
before beginning any installation procedure. Improper grounding can cause ESD.
Access panel
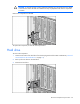
Primary access panel
WARNING: To reduce the risk of personal injury from hot surfaces, allow the drives and the
internal system components to cool before touching them.
CAUTION: To prevent damage to electrical components, properly ground the server blade
before beginning any installation procedure. Improper grounding can cause ESD.
1. Identify the proper server blade in the server blade enclosure.
2. Back up all server blade data.
3. Power down the server blade (on page 28).
4. Remove the server blade (on page 28).
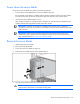
5. Loosen the thumbscrew on the rear of the access panel.
6. Press down on the thumb indentations, slide the access panel toward the rear of the unit about 1.25
cm (0.5 in), and lift to remove the panel.
To replace the component, reverse the removal procedure.
Secondary access panel
WARNING: To reduce the risk of personal injury from hot surfaces, allow the drives and the
internal system components to cool before touching them.
CAUTION: To prevent damage to electrical components, properly ground the server blade
before beginning any installation procedure. Improper grounding can cause ESD.
1. Identify the proper server blade in the server blade enclosure.
2. Back up all server blade data.
3. Power down the server blade (on page 28).
4. Remove the server blade (on page 28).
5. Loosen the two thumbscrews on the rear of the access panel.
6. Press down on the thumb indentations, slide the access panel toward the rear of the unit about 1.25
cm (0.5 in), and lift to remove the access panel.
To replace the component, reverse the removal procedure.
Hard drive blank