
ProLiant BL40p Server Blade Maintenance and Service Guide

Removal and Replacement Procedures
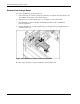
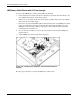
LED/Power Switch Board with I/O Pass-through
To remove the LED/Power switch board with I/O pass-through:
1. Power down the server blade and remove it from the server blade enclosure. Refer to the
“Server Blad e Preparation” section in this chapter.
2. Remove the access panel and the system board tray assembly. Refer to the “Server Blade
Preparation” section in this chapter.
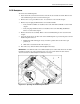
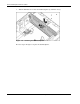
3. Disconnect the power button/LED cable from the back left side of the LED/power switch
board (1) and disconnect the I/O pass-through cable from the back middle area of the
LED/power switch board (2). Refer to “Dia gnostic and Local I/O Cables” in Chapter 4
for identification of the I/O icon.
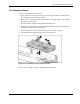
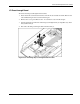
4. Use a T-15 Torx screwdriver to remove the two retaining screws from the LED/power
switch board (3).
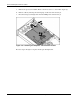
5. Lift the LED/power switch board off the chassis (4).
.
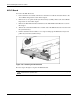
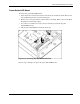
Figure 2-36: Removing the LED/power switch board with I/O pass-
through
Reverse steps 1 through 5 to replace the LED/power switch board.
2-36 HP ProLiant BL40p Server Blade Maintenance and Service Guide