
HP ProLiant BL20p Generation 2 Server Blade Setup and Installation Guide


Installing the Server Blade and Options
The I/O cable connects to the I/O port located on the front of the server blade. The
other end of the I/O cable provides four connectors:
•
•
•
•
•
•
•
•
iLO RJ-45 (10/100 Ethernet) connector—provides a 10/100 Ethernet RJ-45
connector through which you can access the server blade with the iLO Remote
Console and a client PC
Kernel debug connector—requires a null modem serial cable and enables
trained personnel to perform advanced diagnostic procedures
Video connector—provides video capability
USB connector—provides two USB connections enabling direction connection
to the server blade
The diagnostic cable connects to the diagnostic port located on the front of the server
blade. The other end of the diagnostic cable provides two connectors:
iLO RJ-45 (10/100 Ethernet) connector—provides a 10/100 Ethernet RJ-45
connector through which you can access the server blade with the iLO Remote
Console and a client PC
Kernel debug connector—requires a null modem serial cable and enables
trained personnel to perform advanced diagnostic procedures
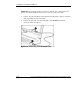
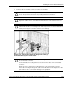
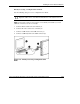
Connecting the Diagnostic Cable or the I/O Cable
Connecting to a Server Blade through iLO
To connect to iLO using either the diagnostic cable or the I/O cable, you must have
the following:
A client PC with a 10/100 Ethernet RJ-45 connector
A network cable with RJ-45 connectors
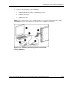
To connect to iLO:
IMPORTANT: Do not connect the diagnostic cable to a hub. All server blades have the same
IP address through the diagnostic port. Multiples on a hub make the server blades
indistinguishable on the network. Refer to “Integrated Lights-Out Advanced Management” in
Chapter 2, “Configuring and Deploying Server Blades,” for the default server blade IP address.
HP ProLiant BL20p Generation 2 Server Blade Setup and Installation Guide 1-31
HP CONFIDENTIAL
Writer: Amy Clute File Name: b-ch1 Installing the Server Blade and Options.doc
Codename: Nipper Part Number: 307158-002 Last Saved On: 9/8/03 2:09 PM